 |
Citrus Growers Forum
This is the read-only version of the Citrus Growers Forum.
Breaking news: the Citrus Growers Forum is reborn from its ashes!
Citrus Growers v2.0
|
|
|
|
Limb Bark Grafting Pictorial Demo.
Goto 1, 2, 3, 4, 5, 6, 7 Next
|
| Author |
Message |
JoeReal
Site Admin


Joined: 16 Nov 2005
Posts: 4726
Location: Davis, California
|
| Posted: Sun 09 Apr, 2006 3:19 am |
|
Although my sample here is currently not a citrus, it can be used for citruses as well. The demo here uses pear scionwood but the principle is the same.
Bark grafting done on a limb as a better alternative to cleft grafting or tongue and whip grafting, best done when barks are slipping. Ideal when the branch is a lot larger than the scionwood.
I had only one failure with this method about 3 years now of grafting, the failure because the scionwood that I used was previously freeze damaged. Very good for grafting plums, apricots, cherries, apples, quinces, pears, etc. I have tried it on citrus this year, and so far they are still green. But for pomes and stones, this is very effective. All of my persimmon grafts this year have been bark graft on limb branches. I have achieved 100% grafting success rate on persimmons with this method. Previously, all other types of grafts were at best 33% successful on persimmons, but this method surprised me with a 100% rate just last year when I tried it the first time on persimmons.
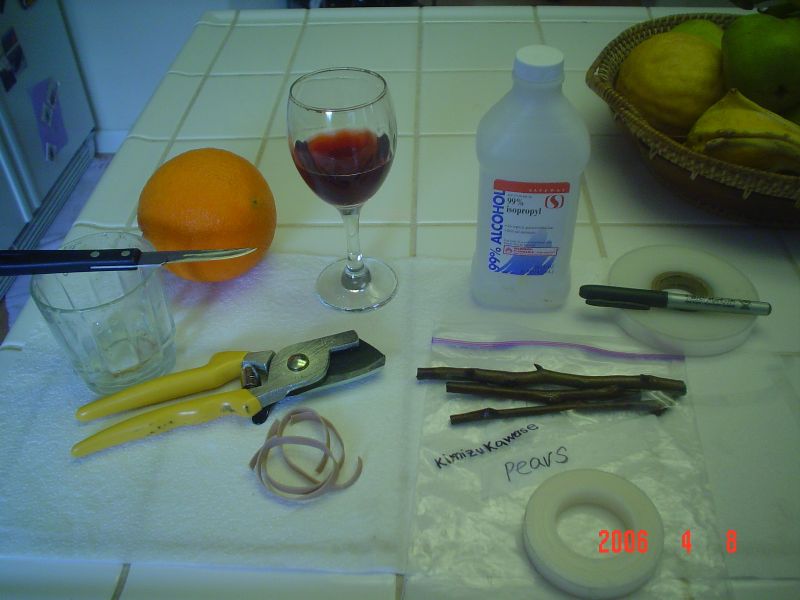
Except for the grafting tape, you should be able to find everything from your kitchen and gardening tools. I intentionally did not include a budding knife to prove that you can use ordinary kitchen knife with this method. So you will find kitchen table and sink.
List of materials:
Paper towel, Pruning shear, rubber band, parafilm grafting tape, glass, sharp knife, marking pen, plastic tape (only for writing the cultivar name), rubbing alcohol for sterlizing (best to use 70% concentration and not the 99% as shown), and most importantly your scionwood (which should be rinsed and wiped before doing this operation). Not shown in the pic is a bread knife or butter spreader knife.
BTW, wine and citrus are optional. That is my pomegranate wine, and Tarocco blood orange. The blood orange reminds me that this pictorial demo is exclusive for this forum as promised earlier in other posts. Exclusive means that I did not post this pictorial demo in any other web sites, but I will post links going into this citrus forum for the demo. It's chilly outside so will have to take a sip from wine.
 |
|
| Back to top |
|
 |
JoeReal
Site Admin
Joined: 16 Nov 2005
Posts: 4726
Location: Davis, California
|
| Posted: Sun 09 Apr, 2006 3:39 am |
|
Take paper towel, pour generous amount of alcohol, then wipe to sterilize pruning shear blade and handle, the knife and handle, the glass, the bread knife, and your hands.
 |
|
| Back to top |
|
|
JoeReal
Site Admin
Joined: 16 Nov 2005
Posts: 4726
Location: Davis, California
|
| Posted: Sun 09 Apr, 2006 3:41 am |
|
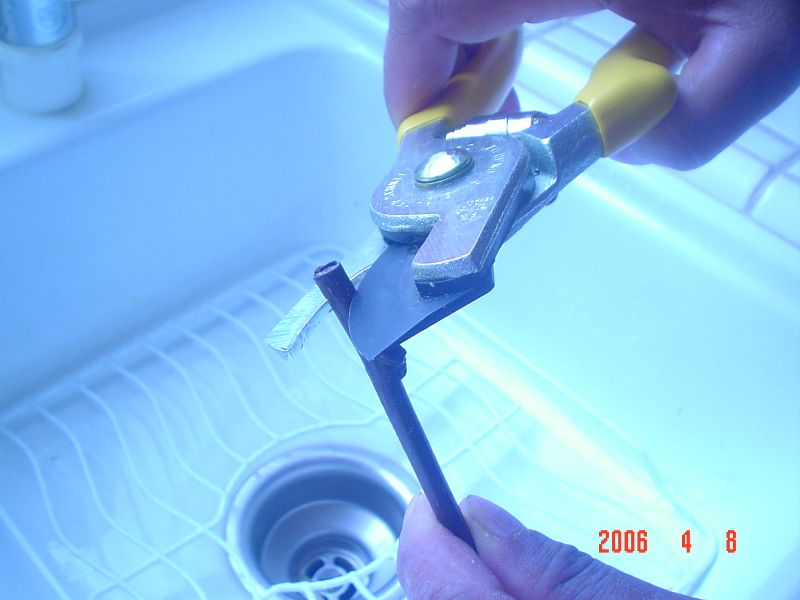
Select a scionwood and nip off 1/2" from the end to discard dirty or contaminated end part.
 |
|
| Back to top |
|
|
JoeReal
Site Admin
Joined: 16 Nov 2005
Posts: 4726
Location: Davis, California
|
| Posted: Sun 09 Apr, 2006 3:45 am |
|
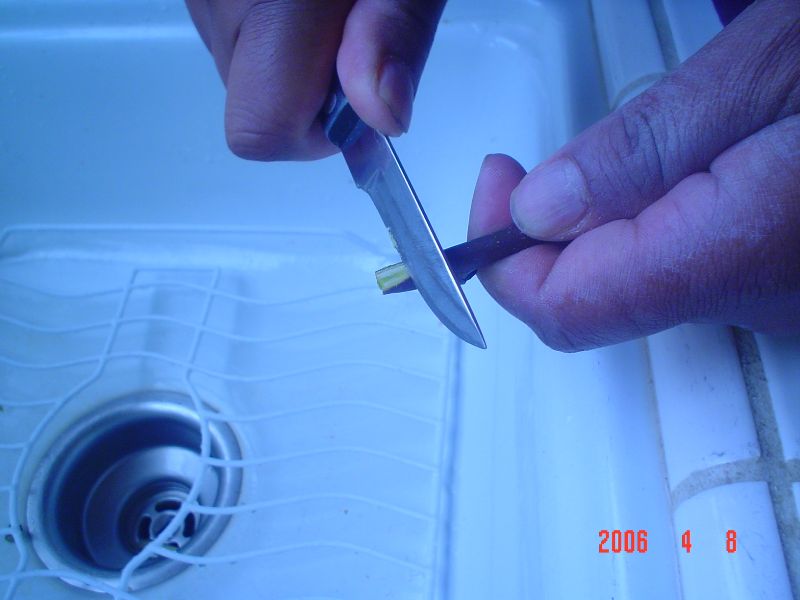
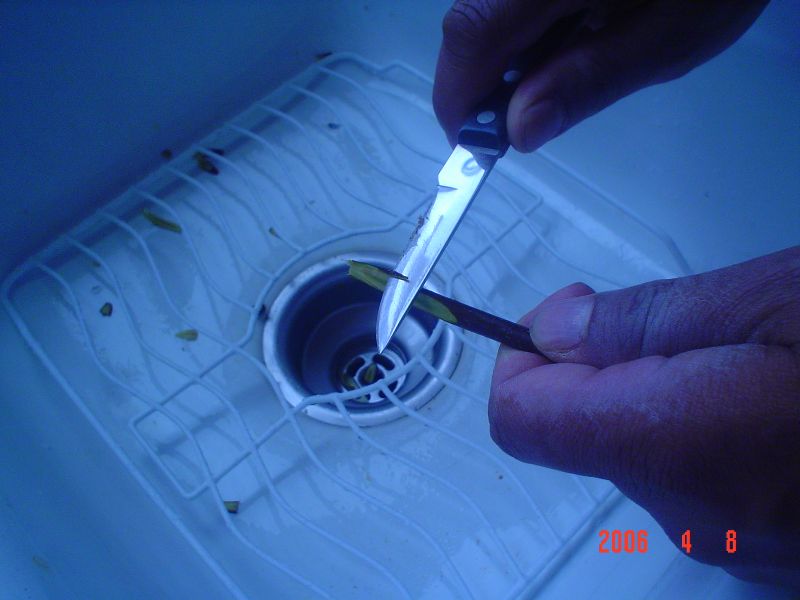
Using the knife, start shaving off tiny bits at a time starting from the end up until you shaved off about 2 inches on one side. My knife is not really sharp compared to my budding knife, so it took me a lot of tiny slices. The white stuff on my hands are from sterilizing with rubbing alcohol. Remember to rinse off and apply moisturizing lotion into your hands at the end of grafting session. Good hands make good grafts too, but don't cut yourself with the knife.
 |
|
| Back to top |
|
|
JoeReal
Site Admin
Joined: 16 Nov 2005
Posts: 4726
Location: Davis, California
|
| Posted: Sun 09 Apr, 2006 3:46 am |
|
Continue shaving off.
 |
|
| Back to top |
|
|
JoeReal
Site Admin
Joined: 16 Nov 2005
Posts: 4726
Location: Davis, California
|
| Posted: Sun 09 Apr, 2006 3:50 am |
|
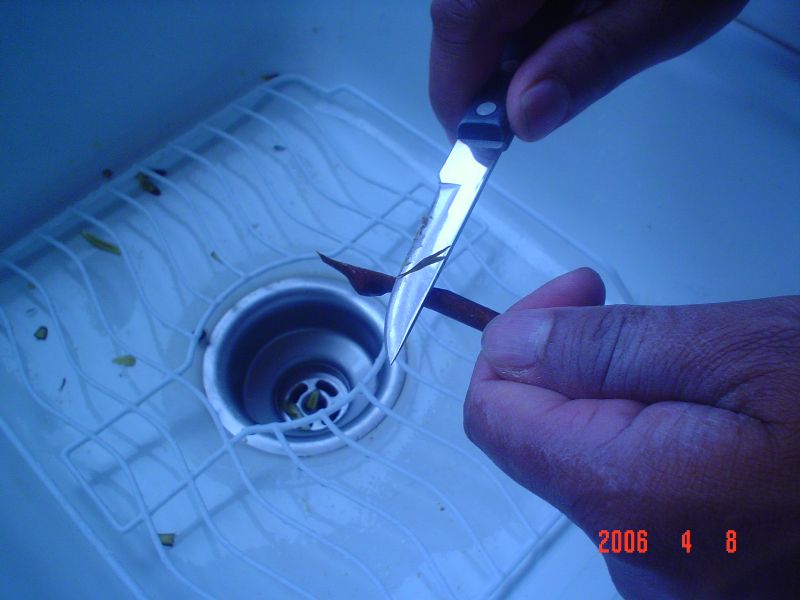
And this is what you hope to achieve. Create a splice on one side only, just like if you want to do tongue and whip or splice grafting, what is important is that the surface of the slice is flat, and about 2" long for a 3/8" diameter scionwood.
 |
|
| Back to top |
|
|
JoeReal
Site Admin
Joined: 16 Nov 2005
Posts: 4726
Location: Davis, California
|
| Posted: Sun 09 Apr, 2006 3:54 am |
|
If you look at it sideways, the splice cut should be straight as much as possible starting from one side, tapering off to the other side. You can achieve near flatness and straightness by practice. Practice first on expendable scionwood before doing on the scionwood that you are going to graft. Notice that I have a bud on the other side, never mind that one, it is just incidental that it is there. Sometimes I have no choice but to use the only scionwood that I have, bud or no bud on the other side. Usually if the end has a bud on it, I don't slice off the bud, instead, I slice off the other side. The bud can serve as extra reserves of food in the stem, perhaps some hormones that can be diverted to healing the cambiums, so I don't take them out if they happen to be at the end of the scionwood that will be bark grafted.
 |
|
| Back to top |
|
|
JoeReal
Site Admin
Joined: 16 Nov 2005
Posts: 4726
Location: Davis, California
|
| Posted: Sun 09 Apr, 2006 4:01 am |
|
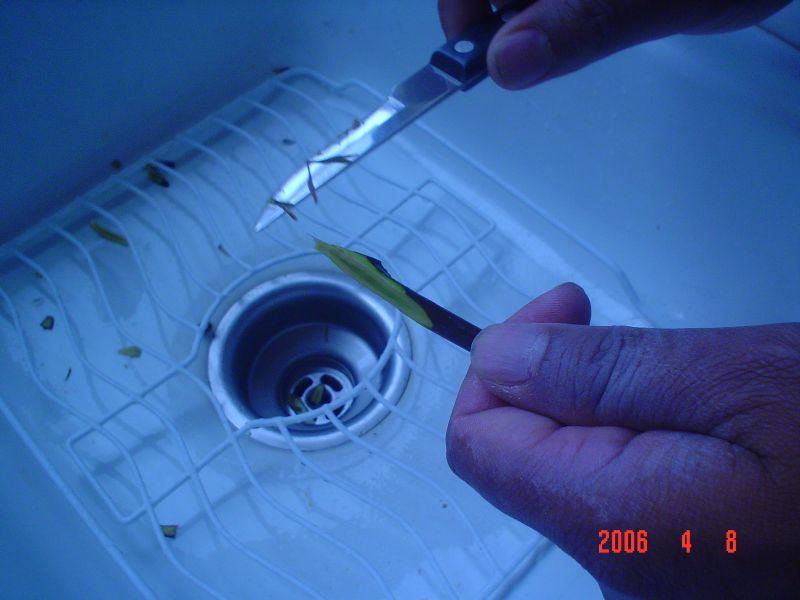
One of the most important detail of my bark grafting style is shown below. Lightly trim off the edges, starting from the middle of the slice to the tapered end. I'm taking out about 1/16" to 1/8" off the edge to expose the cambium layer sideways. Remember that this is bark grafting and exposing this cambium will have very good contact with the destination bark and cambium interface where the callous healing starts and it will enhance survival of the scionwood. Don't forget this tiny but very important detail when doing bark grafting. This detail was mentioned to me by Lucky Pittman after I complained about the low success rates of my early attempts of persimmon grafting, now it's been 100% success rate.
 |
|
| Back to top |
|
|
JoeReal
Site Admin
Joined: 16 Nov 2005
Posts: 4726
Location: Davis, California
|
| Posted: Sun 09 Apr, 2006 4:02 am |
|
Trim off the other side as well, starting from the middle of the slice to the tapered end.
 |
|
| Back to top |
|
|
JoeReal
Site Admin
Joined: 16 Nov 2005
Posts: 4726
Location: Davis, California
|
| Posted: Sun 09 Apr, 2006 4:04 am |
|
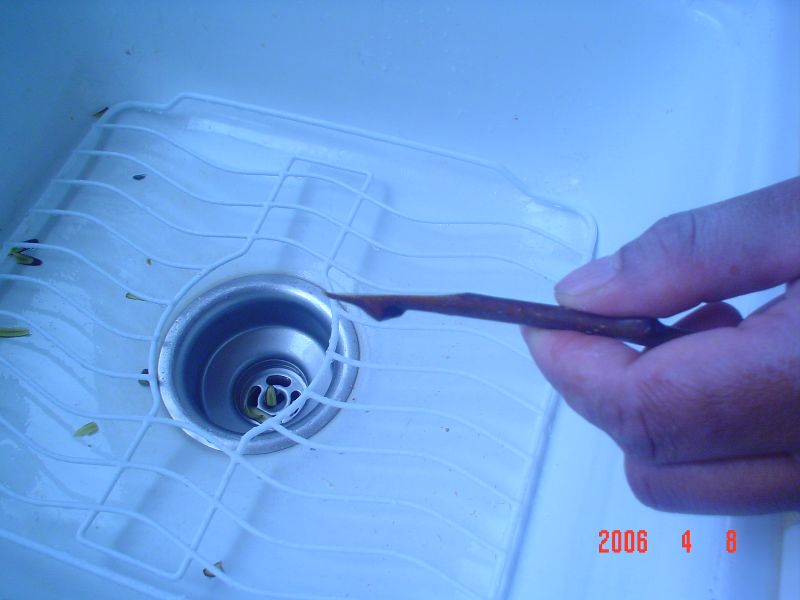
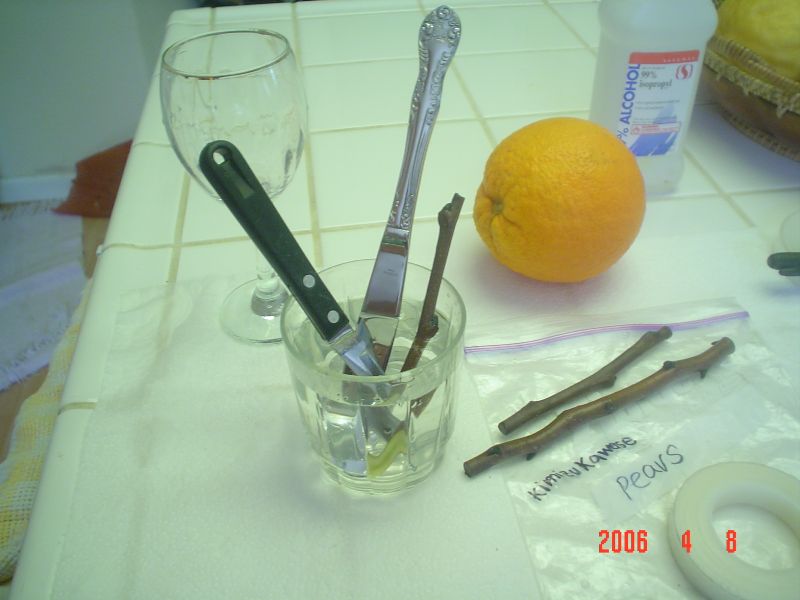
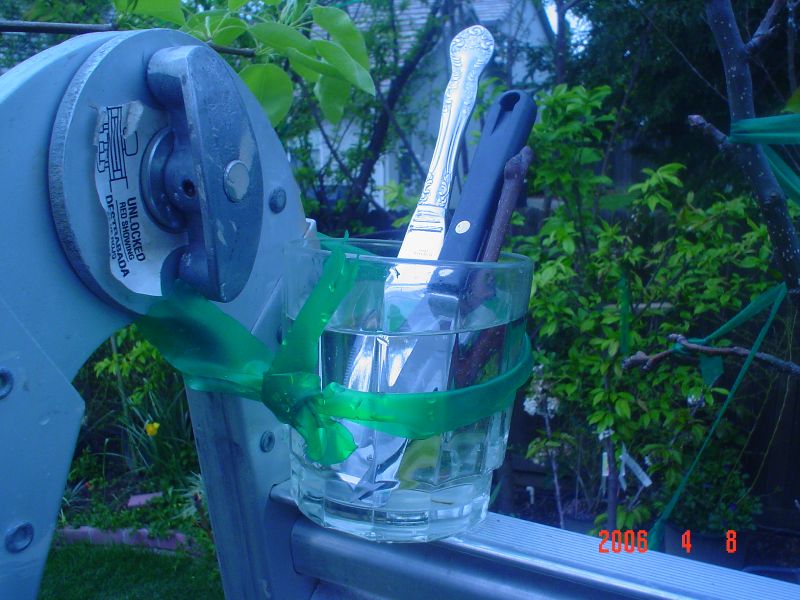
The finished trimmed product. This scionwood is ready for bark insertion. Now we have to park it somewhere while we prepare the destination branch. Fill the glass with clean water and place this prepared scionwood over there, with the sliced end in the water as shown in the pic after this one.
 |
|
| Back to top |
|
|
JoeReal
Site Admin
Joined: 16 Nov 2005
Posts: 4726
Location: Davis, California
|
| Posted: Sun 09 Apr, 2006 4:06 am |
|
Place the scionwood in the water, place also the knife including the bread knife into the same glass so that we will use only one hand when carrying these items. Have also prepared the cultivar label, kimizukawase pear in our example. Ever heard of that one before? but whatever, this one goes into my collection.
(Who drank my wine, well, it is a little bit chilly outside, so the wine is gone).
 |
|
| Back to top |
|
|
JoeReal
Site Admin
Joined: 16 Nov 2005
Posts: 4726
Location: Davis, California
|
| Posted: Sun 09 Apr, 2006 4:11 am |
|
I will have to tie the glass into the ladder using a garden tie (my indispensable fastener on plants and everything else in the yard), to free up one hand so that I can take picture with the other while climbing the ladder. The scionwood remained soaked preventing it from drying while I may spend longer than usual time grafting by taking pictures.
 |
|
| Back to top |
|
|
JoeReal
Site Admin
Joined: 16 Nov 2005
Posts: 4726
Location: Davis, California
|
| Posted: Sun 09 Apr, 2006 4:15 am |
|
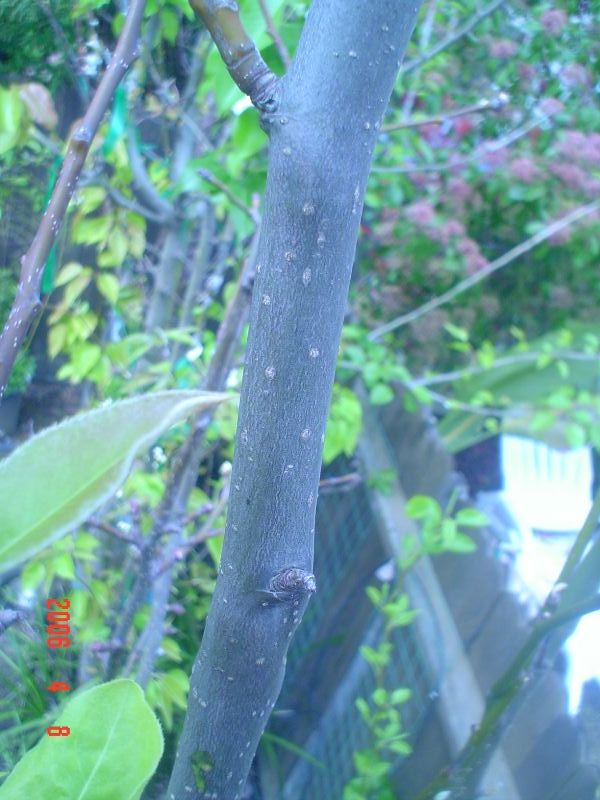
This is the destination branch that I have marked for grafting, just the day before. What I am looking for is that part of the stem with a flat side. Not all stems are round, there are sections that are flat, and if you can find them and fall within the desired height for grafting then use them. If you can't find a stem with a flat side, you can always use whatever shaped stem you have. Plants are very forgiving you know. The flat side just makes better bark graft contact and the job easier too.
 |
|
| Back to top |
|
|
JoeReal
Site Admin
Joined: 16 Nov 2005
Posts: 4726
Location: Davis, California
|
| Posted: Sun 09 Apr, 2006 4:17 am |
|
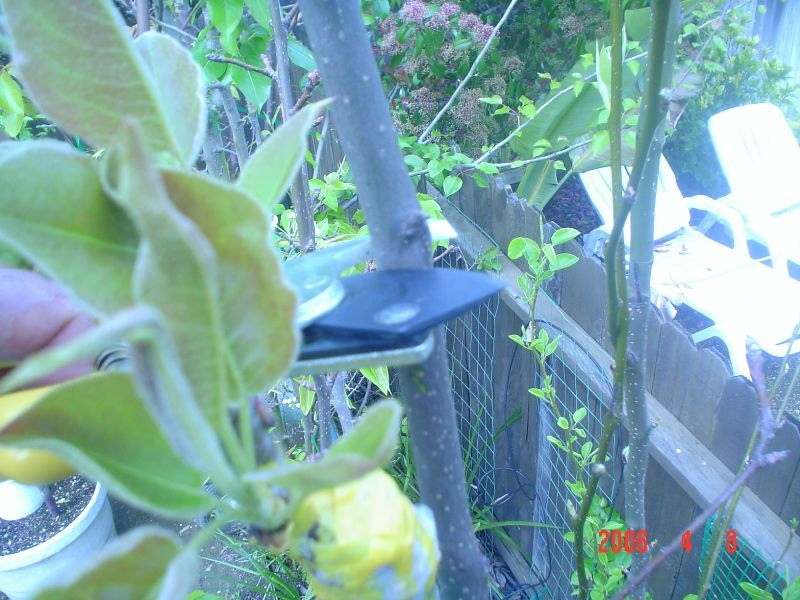
Pruning shear use to cut perpendicularly the destination limb. Note that this limb is side by side with another graft in the foreground which I did earlier during the dormant season, I will have to sacrifice this branch so that we can have this detailed pictorial demo.
 |
|
| Back to top |
|
|
JoeReal
Site Admin
Joined: 16 Nov 2005
Posts: 4726
Location: Davis, California
|
| Posted: Sun 09 Apr, 2006 4:20 am |
|
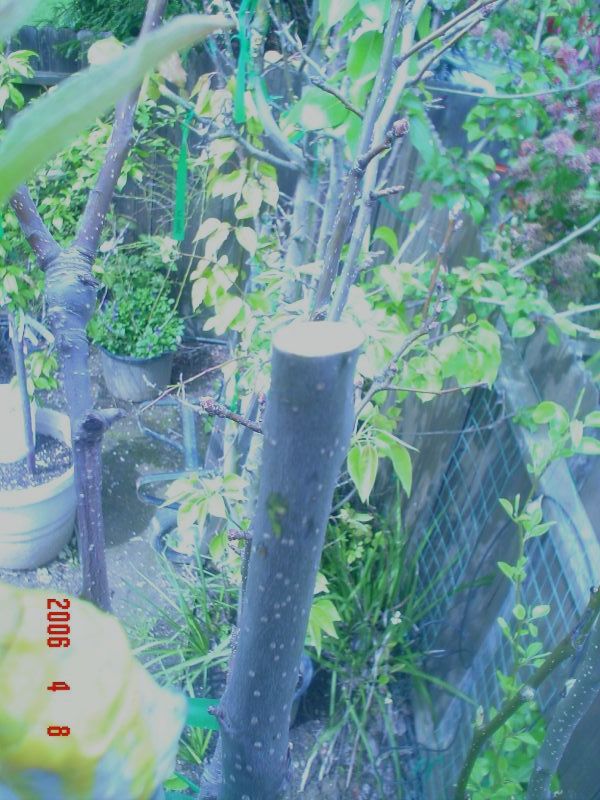
If you notice, there are two flat sides on the elliptical cross section of the stem. I would preferrably graft unto the flat side that is facing south west, the graft heals faster. But if you don't have that south west facing side, any flat side will do as long as your graft will not be shaded out in the canopy.
 |
|
| Back to top |
|
|
| Informations |
 |
Our users have posted a total of 66068 messages
We have 3235 registered members on this websites
|
| Most users ever online was 70 on Tue 30 Oct, 2012 10:12 am |
Powered by phpBB © 2001, 2005 phpBB Group
|
|