| Author |
Message |
JoeReal
Site Admin


Joined: 16 Nov 2005
Posts: 4726
Location: Davis, California
|
| Posted: Sun 23 Mar, 2008 12:51 am |
|
This year, we have far fewer bees visiting my blooms. The Colony Collapse Disorder have taken its toll. I was fortunate to receive from fftulip cocoons of Mason Bees, and I've been meaning to use them as alternative pollinators, long before the CCD was widely known. I have been meaning to use Mason Bees some time ago, and was inspired by EZ, as he is the one I know who have used such pollinators. Thanks to fftulip, a fellow citrus enthusiast for giving me the generous number of Mason Bees. I have stored the bees in the crisper bin of the fridge until I found the time to build them houses.
The major advantages of Mason Bees is that they are gentler than Honey Bees. They never swarm because each one female is a solitary queen in itself, and therefore, they don't have the swarm nor the hive behavior. They will only sting you if they get accidentally caught under your clothes, or you handle them very roughly. The Honey Bees on the other hand, if they sting you, you are marked as an enemy and become target of the whole family that number in the hundred thousand per box.
Nonetheless, the Mason Bees are native to America and were here long before mankind. These should be encouraged as alternative pollinators especially in an urban setting.
Here's much more details about the Orchard Mason Bees:
http://gardening.wsu.edu/library/inse006/inse006.htm |
|
| Back to top |
|
 |
JoeReal
Site Admin
Joined: 16 Nov 2005
Posts: 4726
Location: Davis, California
|
| Posted: Sun 23 Mar, 2008 12:52 am |
|
Mason Bee Housing
Materials:
4" x 4" Douglas Fir at least 6" long (actual dimension is 3.5" x 3.5")
1/4" plywood
2 pairs of matching hook and eye screws
4 pcs 3/4" wood screw
Reynolds Parchment Paper, 15" wide, at least 42" long
10 pcs Hibernating Mason Bees (Cocoons or in Straws)
Equipments:
Miter Saw or table saw or hand saw to cut the 4" x 4" wood
3/8" Drill bit for wood, at least 7" long.
1/16" drill bit
Drill Press or Drill with built-in level guide, or Ordinary Drill and 3" brace
Vise
Center Punch
Hammer
Ruler
Pencil
Screw Driver
1/4" metal rod, 1 ft long
Kitchen Knife
paper cutter or scissor |
|
| Back to top |
|
|
JoeReal
Site Admin
Joined: 16 Nov 2005
Posts: 4726
Location: Davis, California
|
| Posted: Sun 23 Mar, 2008 12:52 am |
|
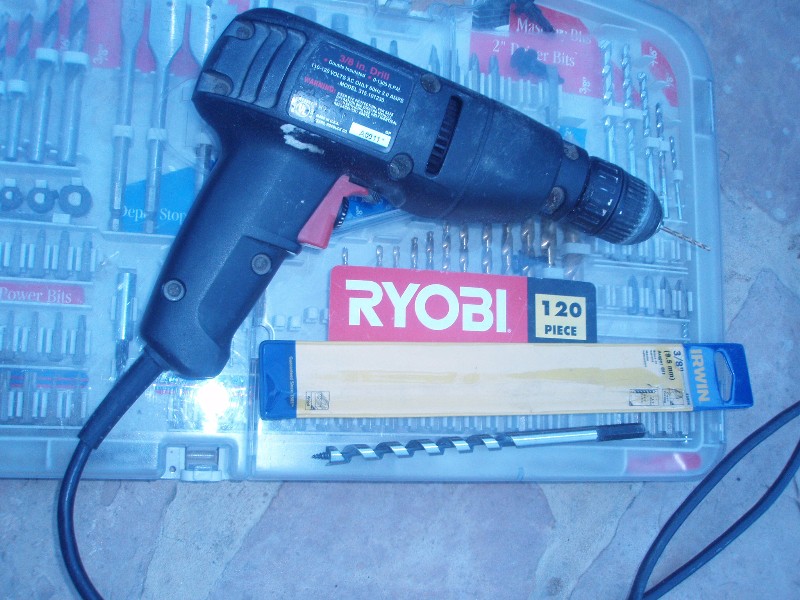
By joereal at 2008-03-21
The most important equipment that you would need is the drill and the drill bit. The drill bit should be capable of drilling 3/8" hole and 6" deep into the wood. The ideal hole size of the most common Mason Bee is 5/16", although different species ranges in size from 1/4" to 3/8". The Mason Bee that was given to me require a hole size of 5/16". The reason why I am using a 3/8" drill bit is because the hole will have a parchment paper liner. After lining the hole with a parchment paper, the final size of the hole would be 5/16" which is perfect size for the Mason Bee that I have obtained. |
|
| Back to top |
|
|
JoeReal
Site Admin
Joined: 16 Nov 2005
Posts: 4726
Location: Davis, California
|
| Posted: Sun 23 Mar, 2008 12:52 am |
|
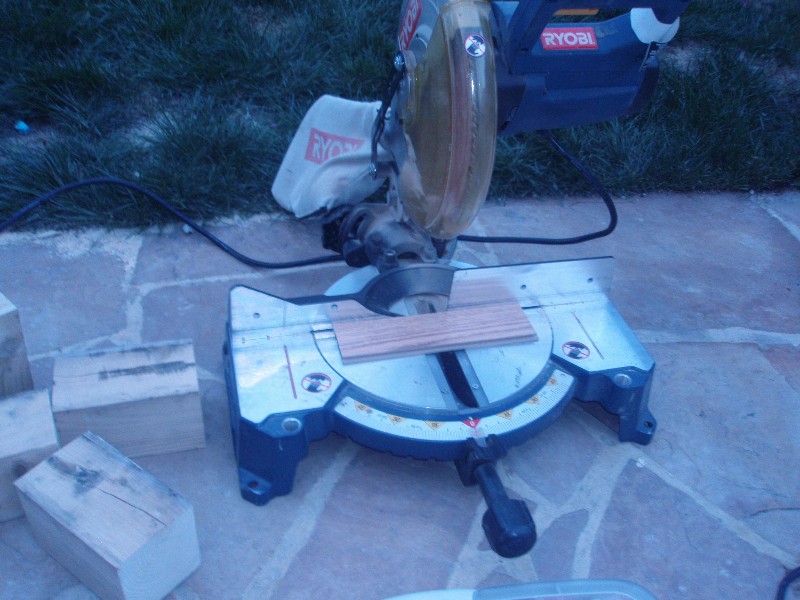
By joereal at 2008-03-21
Miter Saw is very handy to quickly cut pcs of wood, very neatly, very quickly and is more portable than table saw. Of course, you can use Hand saw or table saw if these are the only ones available. The most important thing is that, you are able to cut a 3.5" x 3.5" piece of lumber. |
|
| Back to top |
|
|
JoeReal
Site Admin
Joined: 16 Nov 2005
Posts: 4726
Location: Davis, California
|
| Posted: Sun 23 Mar, 2008 12:53 am |
|

By joereal at 2008-03-21
By joereal at 2008-03-21
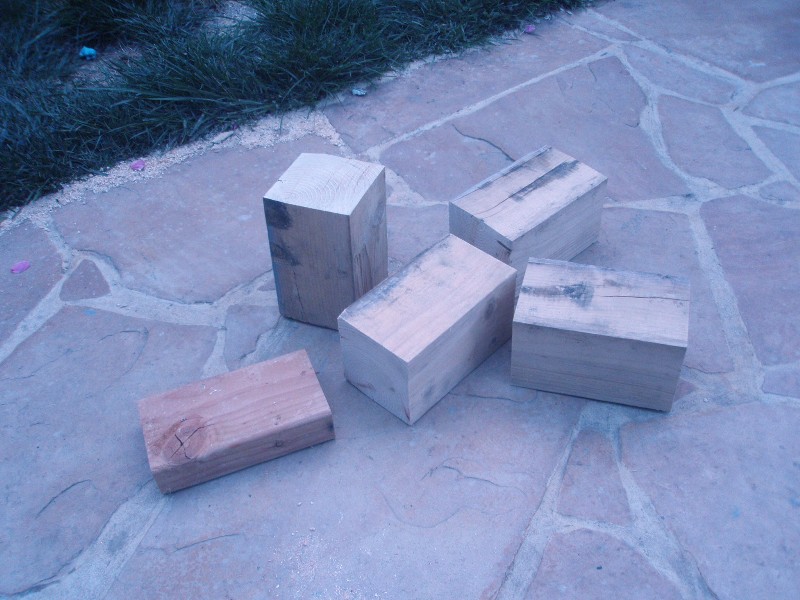
I have obtained 4"x4" Douglas Fir wood that are often used for fence post. You can use Pine wood too. Just avoid using Redwood or pressure treated wood posts as these have insect repellant properties. Mason Bees wouldn't be too happy in those types of wood. I use Douglas Fir, and they costs about $8 for a 6 ft long 4"x4" post. You can go to the wood scrap section of the store, and often you can get odd lengths and can be bought for less than $1 a piece. I got my 3 ft long 4"x4" for free from the scrap bin because the wood that I got has a few cracks in them, so the nice guy at the store just gave it away to me.
The 4"x4" actual dimension if you measured it is exactly 3.5" x 3.5". The major reason is that it is smooth all sides, and so some dimensions were lost during the smoothing process. Simply cut the wood into 6" long pieces. The actual dimensions of the wood blocks shown above is 3.5" x 3.5" x 6". You make a lot of these houses for future expansion of your bees. |
|
| Back to top |
|
|
JoeReal
Site Admin
Joined: 16 Nov 2005
Posts: 4726
Location: Davis, California
|
| Posted: Sun 23 Mar, 2008 12:53 am |
|

By joereal at 2008-03-21
The recommended spacing of holes are shown above. Notice that the holes should start at least 1/2" from the wood's edge. They are also arranged alternately to keep spacing between holes as far as possible. The hole spacing when configured from the above illustration is between 0.9"-1.0". If you follow this spacing, you should be able to fit 12 holes inside the 3.5" x 3.5" wood. Use your pencil and ruler to layout the grid patterns at the smoother end of your wood block. Or you can also use paper template by using your computer. |
|
| Back to top |
|
|
JoeReal
Site Admin
Joined: 16 Nov 2005
Posts: 4726
Location: Davis, California
|
| Posted: Sun 23 Mar, 2008 12:53 am |
|
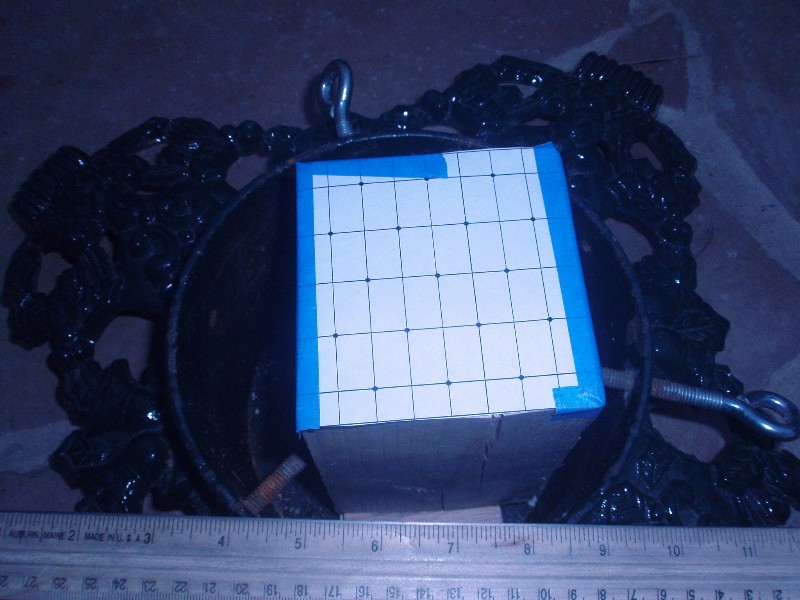
By joereal at 2008-03-21
You can fit more holes as long as you can drill comfortably straight down. The spacing between holes would be dependent on how you handle the drill. Too near each other, you will have overlapping holes at the other end of the wood, and you should avoid that. I can comfortably drill straight through if the spacing is 0.8" between holes. And I was able to fit 17" holes on the 3.5" x 3.5" wood block. I laid out the pattern on a computer so that it would be more precise and easier to manipulate. This way, I was able to add more holes according to the minimum hole spacing that I am comfortable with.
I cut the template and tape it to the smoother end of the block. Secure it unto a vise grip. Since I don't have a vise grip, I used our Christmas tree stand. It is heavy and holds the block very well. |
|
| Back to top |
|
|
JoeReal
Site Admin
Joined: 16 Nov 2005
Posts: 4726
Location: Davis, California
|
| Posted: Sun 23 Mar, 2008 12:54 am |
|
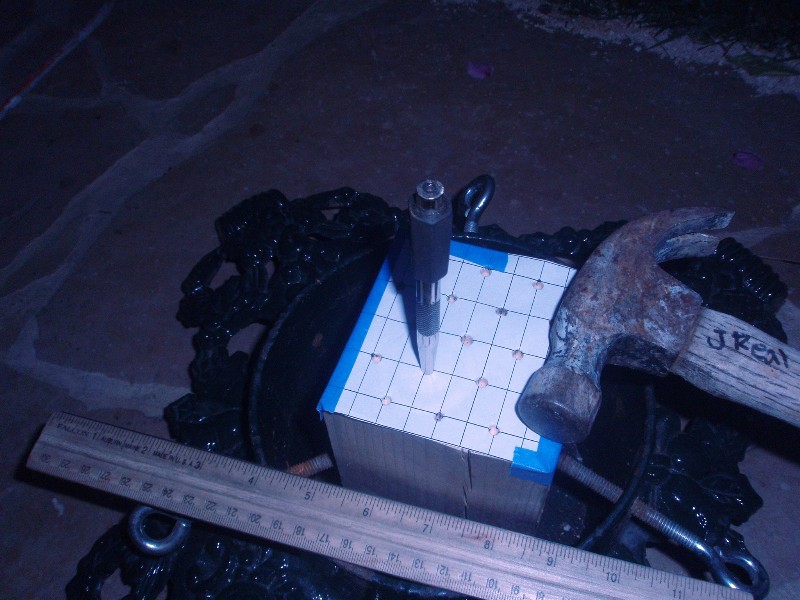
By joereal at 2008-03-21
After marking the holes or securing the hole template, and securing the block on a vise, use center punch and hammer to initially mark out the holes for drilling. I simply remove the template and reuse it for the next block of wood. |
|
| Back to top |
|
|
JoeReal
Site Admin
Joined: 16 Nov 2005
Posts: 4726
Location: Davis, California
|
| Posted: Sun 23 Mar, 2008 12:55 am |
|
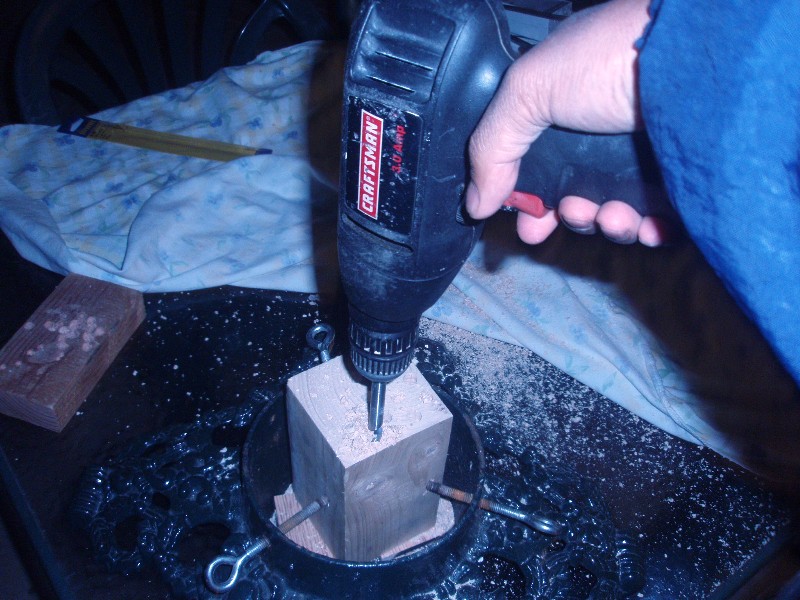
By joereal at 2008-03-21
Use the 3/8" drill bit for wood that is at least 7" long to drill the holes through the 6" long block. This is the most challenging part. Normally, drill press would be perfect for this job, but not all of us have drill press that can drill perpendicularly straight down. I use a drill that have a built-in leveler at the back. It helps me drill holes straight down. If you don't have such a drill, you can use an ordinary drill and a 3" square brace. Place the brace flat on top of the wood, then align your drill bit next to it to guide it straight down. After you drill about 3", you can remove the brace and you should be able to drill straight down without a problem. The drill must go through the 6" block of wood, end to end. |
|
| Back to top |
|
|
JoeReal
Site Admin
Joined: 16 Nov 2005
Posts: 4726
Location: Davis, California
|
| Posted: Sun 23 Mar, 2008 12:55 am |
|
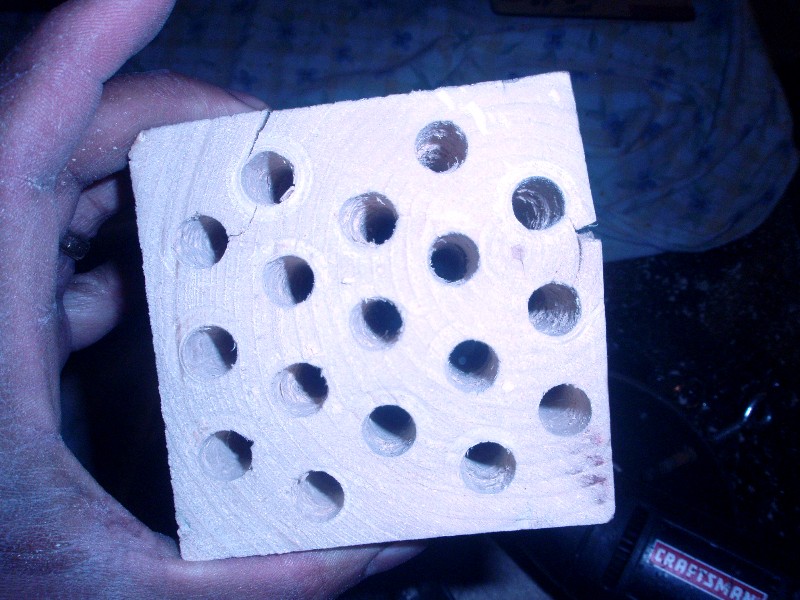
By joereal at 2008-03-21
And here's 17 holes that are 6" deep drilled through this block of wood. |
|
| Back to top |
|
|
JoeReal
Site Admin
Joined: 16 Nov 2005
Posts: 4726
Location: Davis, California
|
| Posted: Sun 23 Mar, 2008 12:55 am |
|
By joereal at 2008-03-21
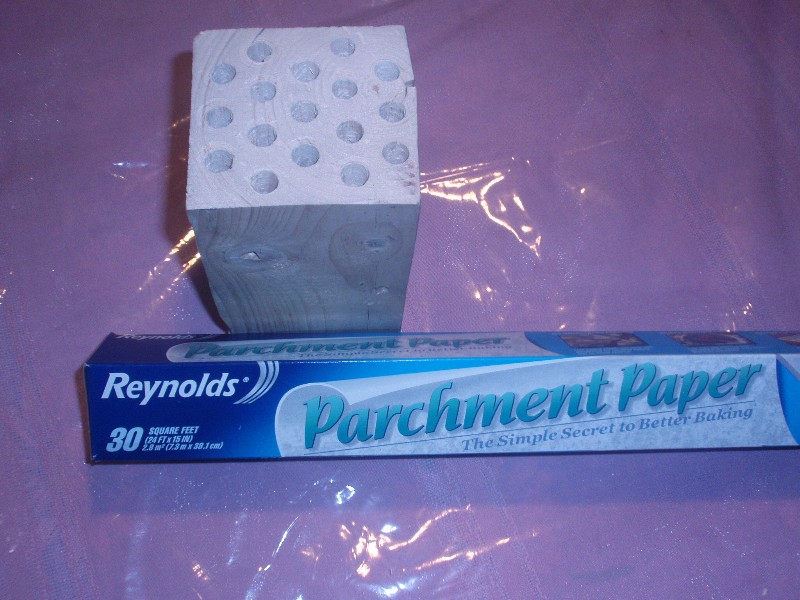
Next step is to prepare the liners for the holes. The major purpose of the liner is that it you will be able to take out the bees when they are hibernating, inspect them and clean them up. Mites are also a problem amongst the Mason Bees. You will sometimes have to clean the holes of these pests when there is major infestation. The use of liner facilitates all that. You can pull the liners easily from the holes, open them, and clean up if needed and then place back again. You can also have the dormant bees tucked inside the liners and ship them off to friends who would want them, or you can sell them off. Because we are using liners for the holes, we drilled holes that are slightly bigger in size that are recommended, so that when we place the liners, the final hole size is perfect for the Mason Bees.
One of the best recommended liner is the Reynolds Parchment Paper. There are other liner papers that often have waxes on them but they are often chewed by the bees and defeat our purpose of using them. There have been no reports of other problems when using Ryenolds Parchment paper. Buy the size that is 15" wide so that it can be cut into 3 pcs of 5" x 6 1/4" sections. |
|
| Back to top |
|
|
JoeReal
Site Admin
Joined: 16 Nov 2005
Posts: 4726
Location: Davis, California
|
| Posted: Sun 23 Mar, 2008 12:56 am |
|

By joereal at 2008-03-21
Cut the parchment paper into 5" x 6 1/4" size. You can first mark out 6 1/4" marks along the length of the 15" wide parchment paper and then cut them with paper cutter. Then cut each one into 5" sections, giving you three pcs of 5" x 6 1/4" liner sheets. |
|
| Back to top |
|
|
JoeReal
Site Admin
Joined: 16 Nov 2005
Posts: 4726
Location: Davis, California
|
| Posted: Sun 23 Mar, 2008 12:56 am |
|

By joereal at 2008-03-21
Make as many liner sheets as you have holes. |
|
| Back to top |
|
|
JoeReal
Site Admin
Joined: 16 Nov 2005
Posts: 4726
Location: Davis, California
|
| Posted: Sun 23 Mar, 2008 12:56 am |
|

By joereal at 2008-03-21
Pick up one liner sheet and roll it unto a 1/4" metal rod that is about a foot long. The 6 1/4" length should along the length of the metal rod.

By joereal at 2008-03-21
Continue rolling until the sheet is snugly fit unto the metal rod. |
|
| Back to top |
|
|
JoeReal
Site Admin
Joined: 16 Nov 2005
Posts: 4726
Location: Davis, California
|
| Posted: Sun 23 Mar, 2008 12:57 am |
|

By joereal at 2008-03-21

By joereal at 2008-03-21
Hold the paper snugly unto the rod and insert it into the hole in the block. If you encounter some resistance, simply rotate the metal rod along the direction of the roll of the paper while wiggling it in, until it comes out at the other end. Then simply let go of the paper and it will slightly uncurl. Remove the metal rod, leaving the paper in place. |
|
| Back to top |
|
|